How well does Minecraft run on an M1 Mac?
I’ve been playing Minecraft on my M1 Mac mini now for a few months, and the good news is it works great.
Many people have been asking me in the comments on my Let’s Play YouTube series - how does Minecraft perform on M1 Macs? Specifically, people are interested in the FPS I’m able to get.
That’s not a simple question to answer as it depends on your setup. So I’ll do my best to test the most common scenarios people will have and give you an idea of the kind of numbers you should expect to see.
The simple answer is: it plenty good enough to play vanilla Minecraft at high enough FPS, and for the most part, you shouldn’t notice any lack of smoothness in your gameplay.
First, a little about my setup that I used to perform these tests.
I have the M1 Mac mini with 16gb of Ram. It’s connected to an LG Ultrafine 5k display that the Mac is obviously driving continuously, regardless of the size of the window I run Minecraft in. I performed these tests with only Minecraft running and Activity Monitor so I can see the CPU and GPU usage. I’m going to assume you’re only playing and not recording or streaming for the time being. I wouldn’t expect performance to be any different if you have an M1 mac with 8gb of RAM.
If you have the M1 MacBook Air, then you might find after prolonged gameplay performance starts to drop a little, especially if you run the game on an external 4k display at native resolution. The is due to the fact it does not have a fan to cool itself down like the Mini and the MacBook Pro. If you do experience this then simply drop your resolution down a notch or knock off a few chunks off the render distance and you should be fine. This is especially true if you have the entry-level Macbook Air with binned GPU that only has 7 cores.
With a game like Minecraft, any more than 60fps is a bit pointless. In my view, this game looks buttery smooth above 45fps and I struggle to notice any difference from there on up. So in these benchmarks, we’re ideally targeting 45fps+.
There are a lot of settings to play with and both your computer setup and also how you decide the run the game can have a big effect on the performance you’re able to get out of your M1 Mac.
A small caveat at the time of writing in February 2021 - Minecraft is not yet optimised for M1 Macs/ARM. Java itself isn’t optimised for ARM yet, so until that’s is done I’m assuming Mojangs hands are tided. I would hope that will be coming later this year.
Because there are so many settings, we’re going to work on the assumption here that we want all the details on maximum. The only setting unavailable to M1 Mac users today is making graphics quality set to ‘Fabulous’. It does show up in the menu and gives you a warning - do not activate it as it simply crashes the game. In the meantime, you’ll have to make do with what they call ‘Fancy’, and personally, I find that fancy enough.
Full list of the setting I used for these tests below.
So now I’m going to run through all your options and let you know how far you can push Minecraft on an M1 Mac.
I’ll focus on vanilla Minecraft, un-modded, running the same as you would find it if you downloaded it from Mojang yourself today. I’m using the latest release 1.16, and although 1.17 is just around the corner, I would be surprised if it ran any differently - they seem to mostly be focussing on new materials and world heights - a few things in there I’m really looking forward to, but nothing that leads us to assume performance might get worse, or better.
I did also performed these same tests using Optifine if you’re interested.
The first question to ask if you’re using Minecraft windowed or full-screen. By default, the app will run windowed on a Mac and always set itself to a strange default size.
Windowed
If you run your game windowed, the size you make the window is the resolution at which the game will run. This may seem strange, but you define the game resolution based on that window size. This means the performance you’re able to get will depend on how large you make that window.
There are apps like Moom that allow you to define a list of pre-sets to scale windows to (amongst other great features). See below for details on how to set up Moom if you are interested.
From what I can tell, windowed runs the app at the resolution in pixels not points, so with Macs that’s natively a 2X retina density.
I run my game windowed at 3840x2160 (4k, or 1920x1080 pt on a @2x screen). If I’m also recording or streaming then I step that down to 2560x1440 (2k, or 1280x720 pt on a @2x screen).
Full-screen
If you’re using a laptop screen, going full-screen is going to be the best setup as you only have 13” to play with - you need to use all those pixels to fill that small view with Mincecrafting.
If you’re using an external display it’s going to depend on the monitor size, resolution and your personal preference.
If you run it full-screen you can set the resolution independently to render scaled in the display settings of the game. In full-screen mode you can target any number of resolutions up to the maximum your monitor can support.
If you’re using an external display, it’s going to depend on what that display is capable of. The most common monitor sizes are 1080, 1440 (2k), and 2160 (4k). I have a 5k display (2880) and I’ll test all these resolutions both windowed and full-screen on this monitor.
Personally, when playing at my computer my eyes are only 20 inches/50cm away from my 28-inch screen, so full-screen games in first person make me feel motion sick. You may have a smaller monitor or be sitting further away, so it might work well for you to go full-screen on your external display. No judgement ;)
I did these tests with only Minecraft running, everything else was closed.
Resolution tests
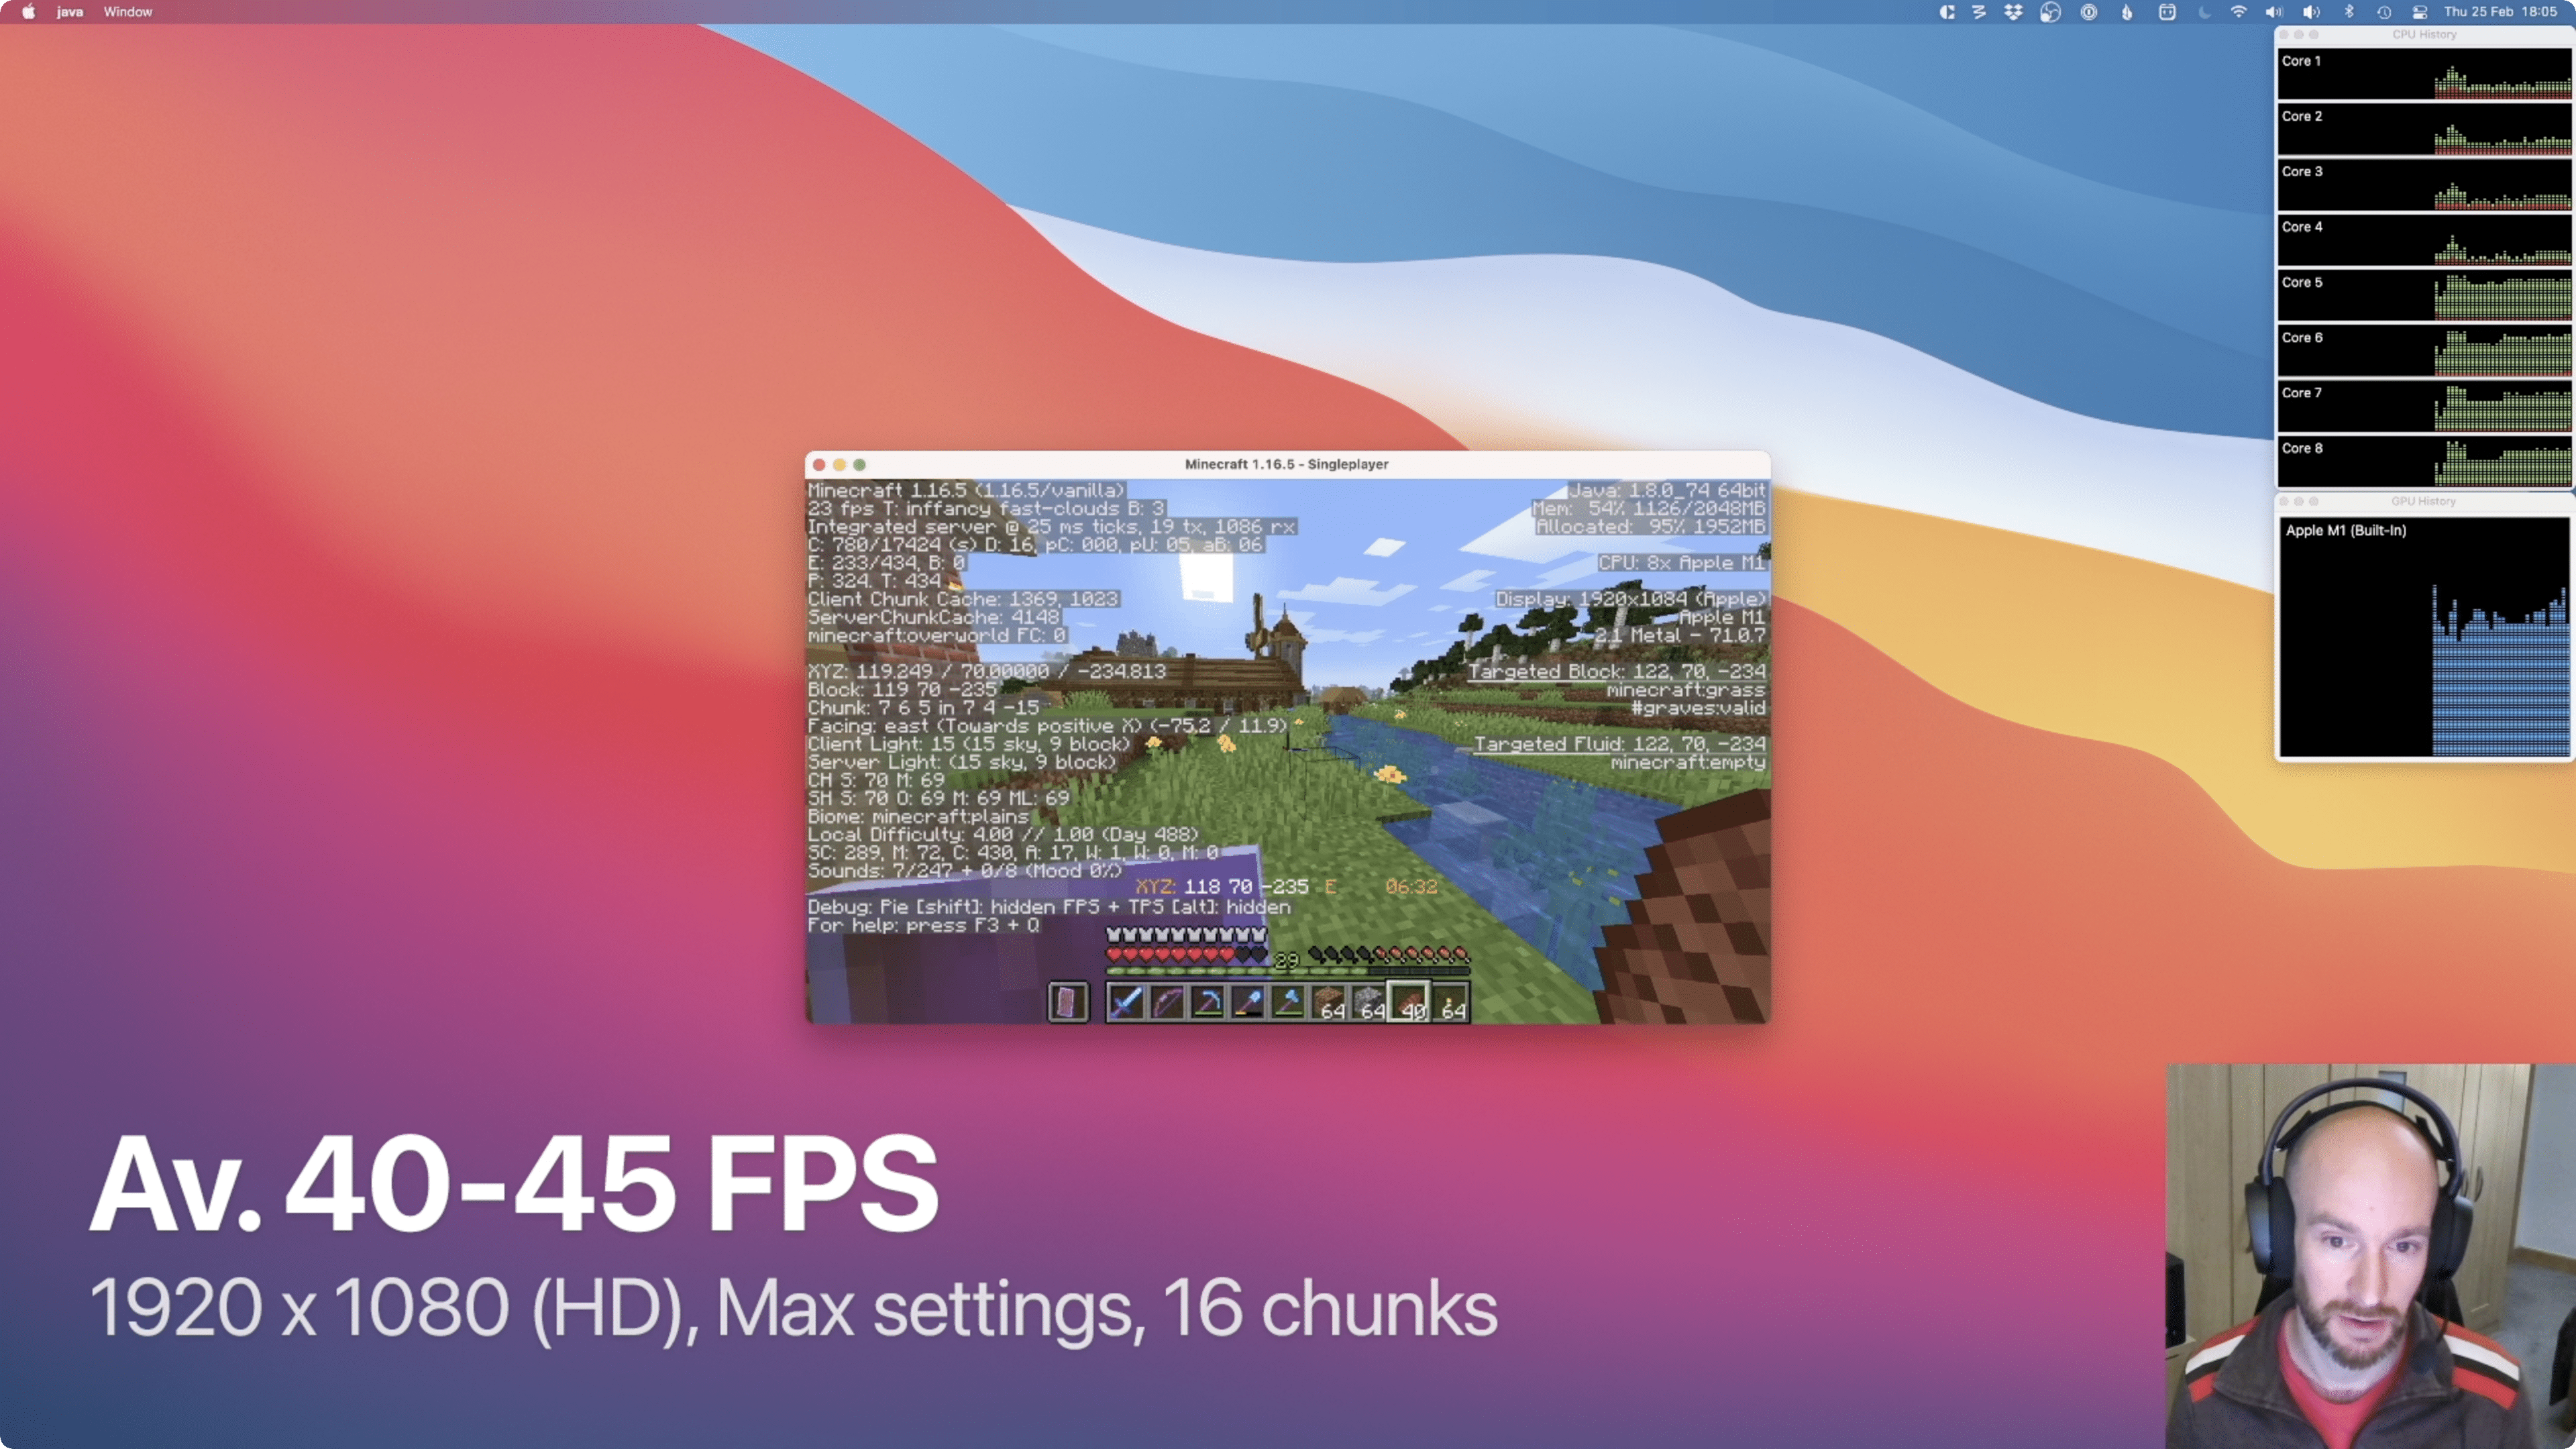
1080 (HD)
Frame rates on average between 40-45 fps.
Super smooth gameplay, as you would expect for a lower resolution like this. No issues running Minecraft at this resolution.
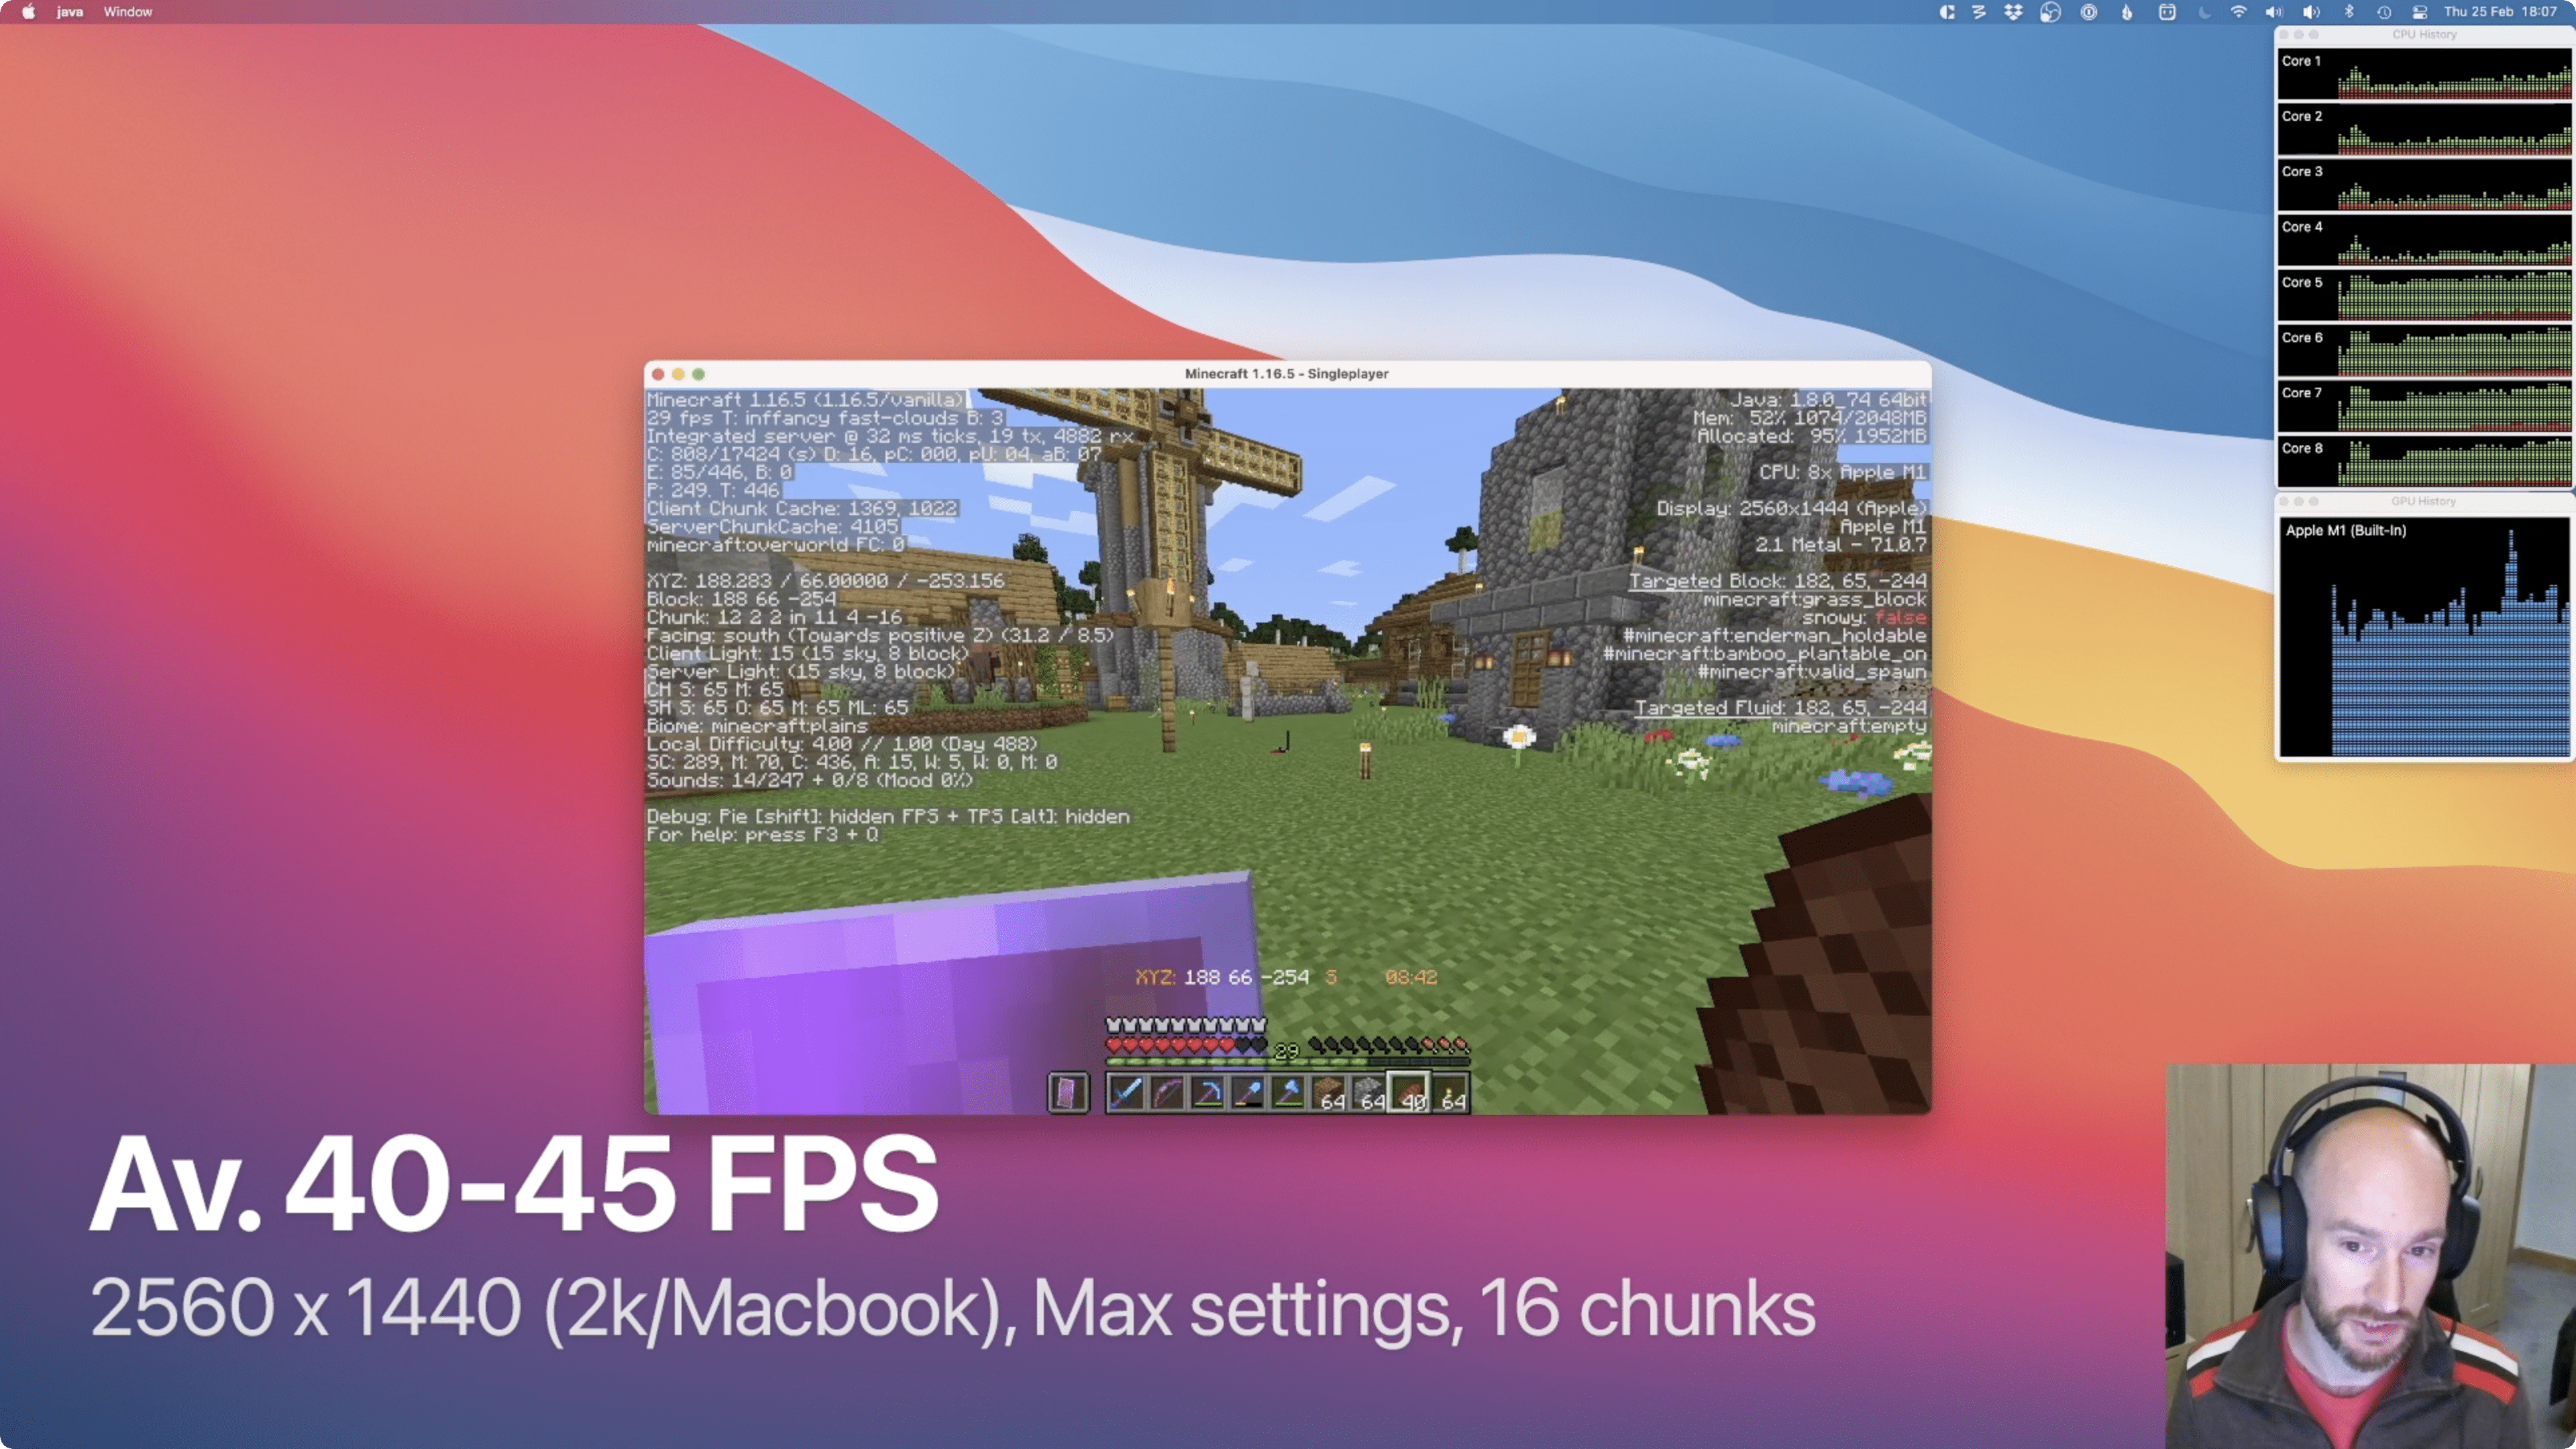
2560x1440 (2k/MacBook screen)
Frame rates on average between 40-45 fps.
The averages were actually the same as the 1080 test, resulting in buttery smooth gameplay, which was surprising! I did however see the highest peaks go higher at 1080 (fps peaked in the 90’s at 1080, whereas the max at 2k was in the 70’s), but you won’t notice a thing.
I also tested the 2560x1600 13" MacBook monitor resolution independently but saw no difference in the numbers.
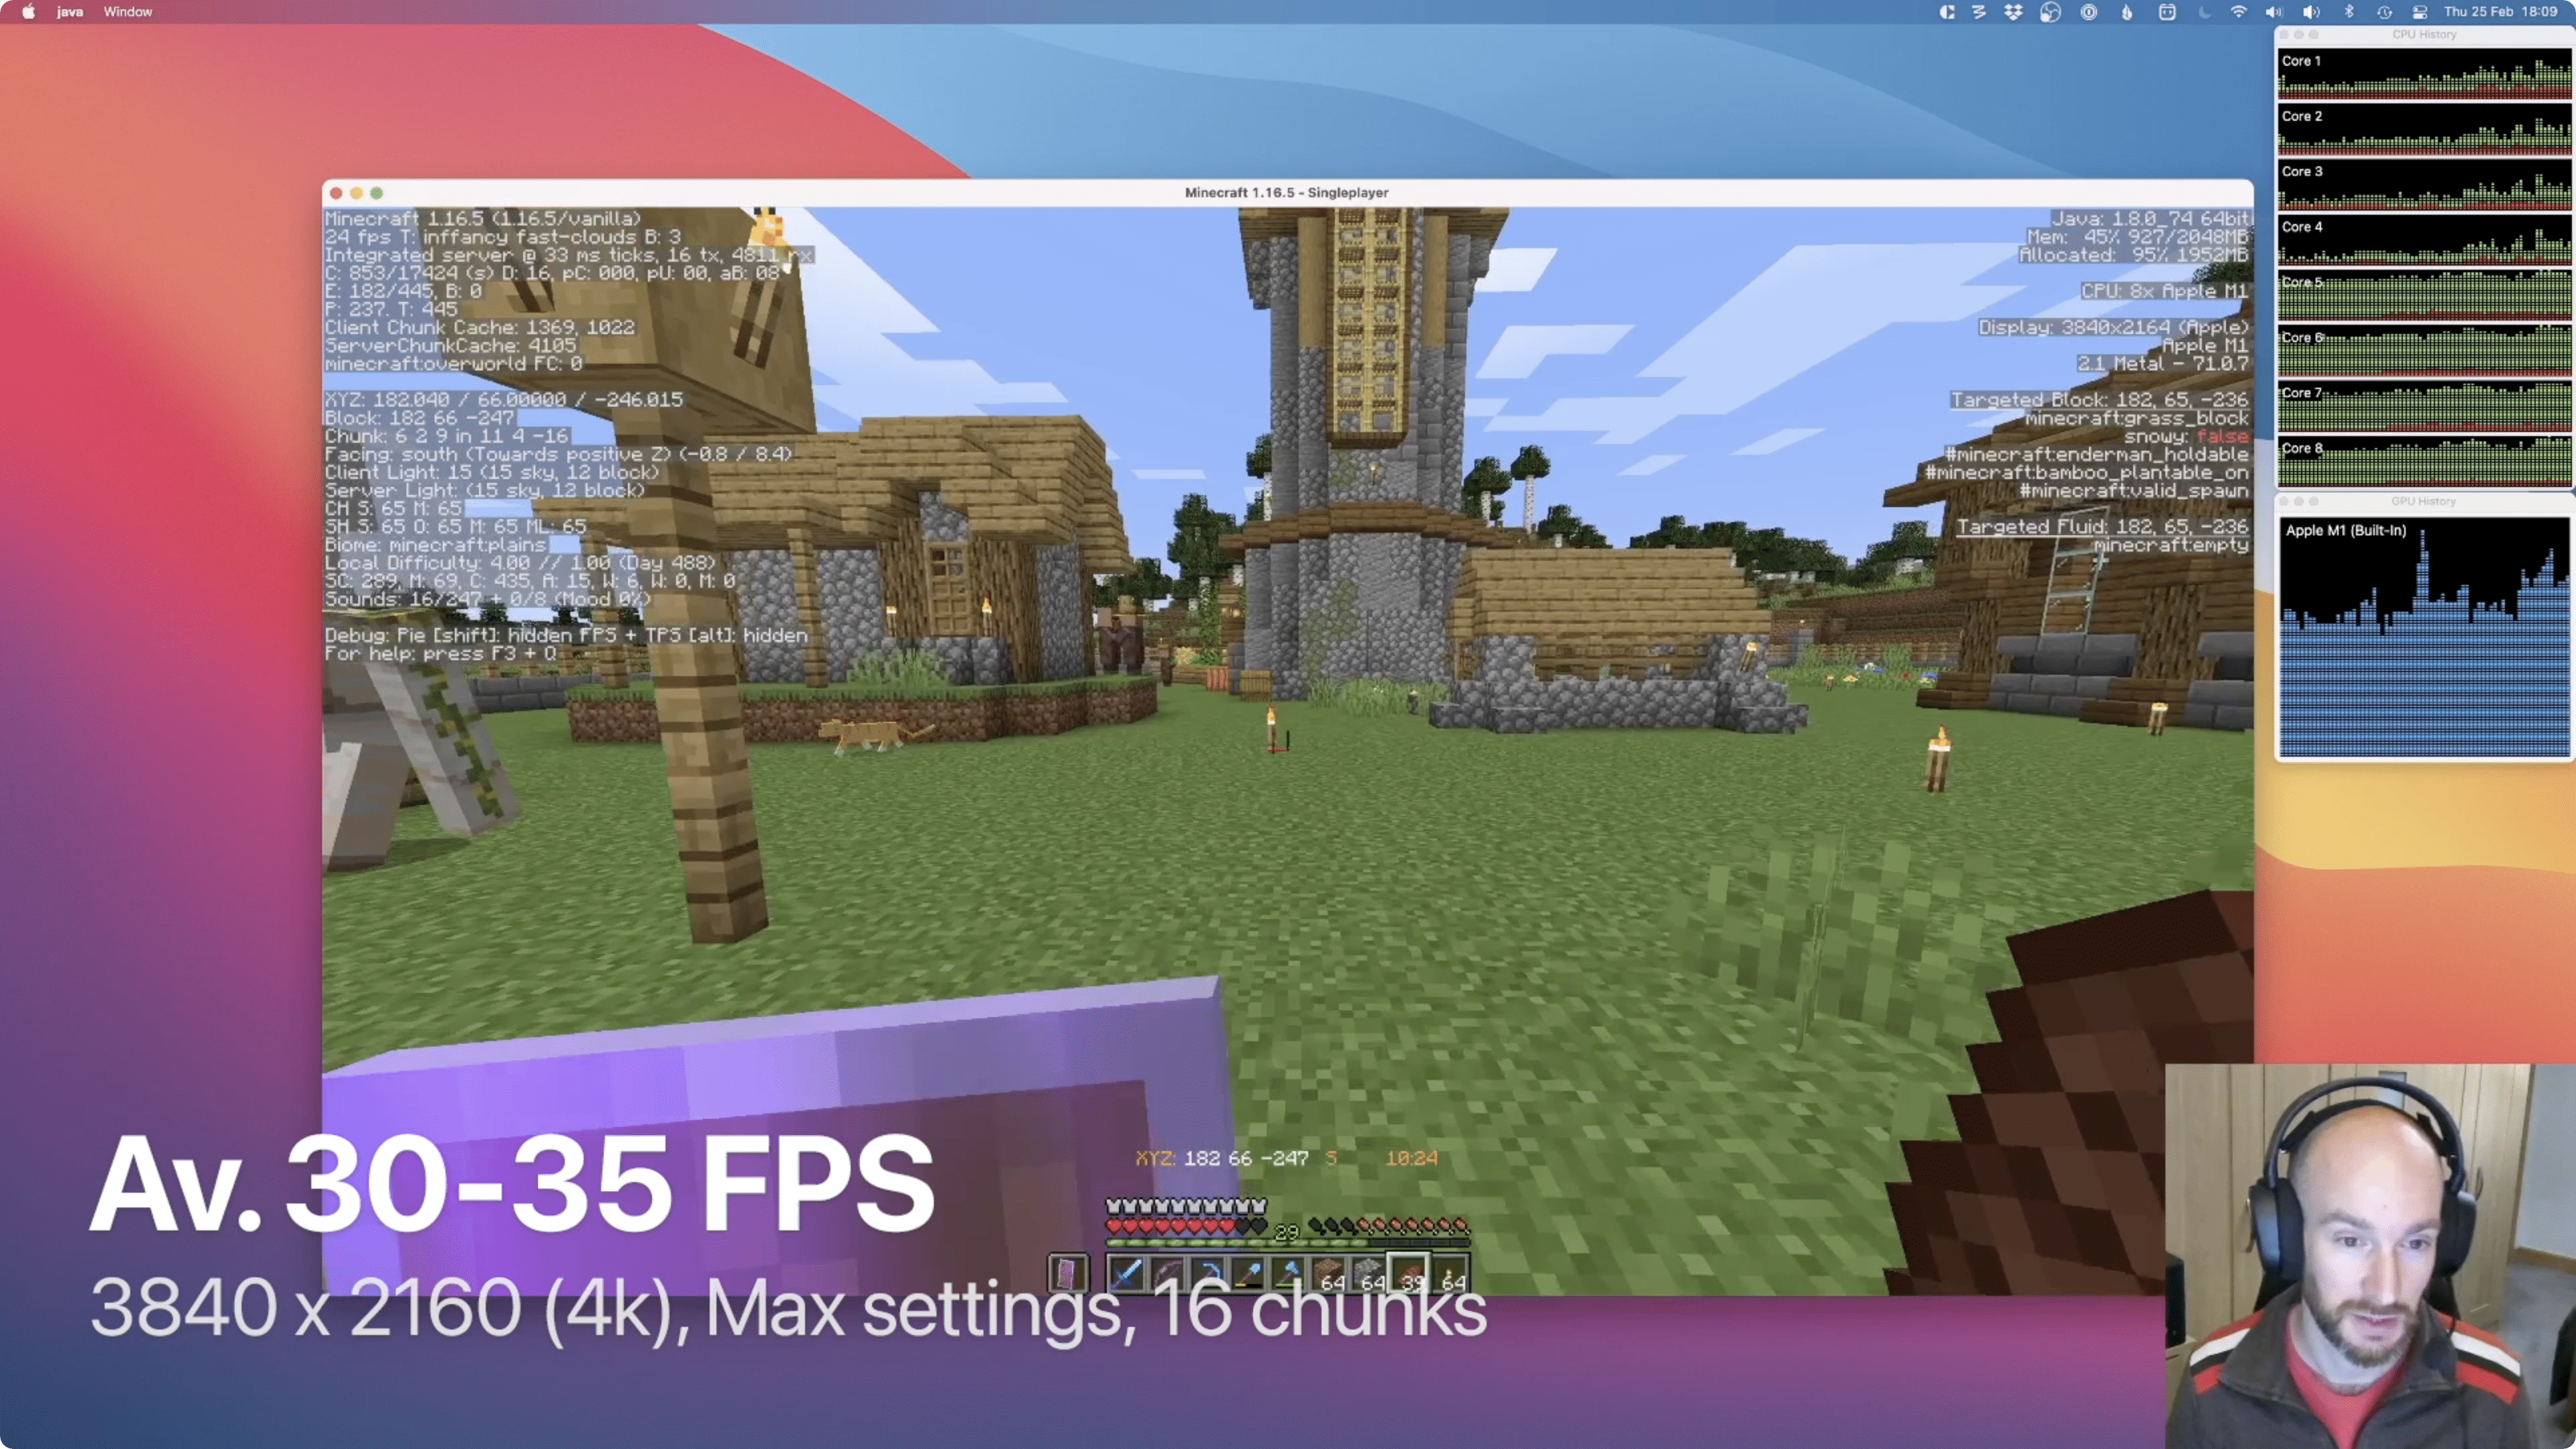
3840x2160 (4k)
Frame rates on average between 30-35 fps.
A 20-25% drop in performance at this resolution. I wouldn’t call this buttery smooth, but it’s very playable with almost no major degradation in gameplay for a game like Minecraft. Not bad considering there are twice as many pixels to push as 2k. The game is still playable at this fps, it just gets a little choppy if there’s a lot happening on screen at once. If you wanted yo could play Minecraft on a. 4k screen at native resolution and get away with it. But you cannot record or do anything else at the same time.
5120×2880 (5k)
Frame rates on average between 25-28 fps.
Stepping up to 5k breached the limits of what the M1 GPU can do with Minecraft running in emulation like this. The frame rate was consistently too low to make it playable. Bear in mind this is 5 times the numbers of pixels as 1080, and most people do not have 5k displays. I do (for work purposes) and I don’t want to game full-screen on it as I find it overwhelming.

In summary
The M1 Macs run Minecraft really well. Whether you’re playing on a 13” MacBook Air or MacBook Pro using the laptop screen or plugged into any of the most common monitor sizes - you should be fine to play however you want.
If you want to record and stream at the same time, you will have to compromise on the resolution and/or render distance to accommodate for the power tools like OBS require to do their job at the same time.
I hope a future optimisation of Java and Minecraft do come that in theory should give us a pretty significant boost in performance, allowing us to push higher resolutions and render distances even further. I dream of a Mac GPU supporting Ray Tracing like we see on the RTX series of Nvidia cards.
If you’d like to see a follow-up on this where I show how you can eek more performance out of the M1 by running Optifine and fiddling with those settings - let me know in the comments of my YouTube video.
If you like the look of the world I showed in the video - please subscribe and watch my let’s play series where I build that world from scratch.
Check out my post and video showing the same tests when using Optifine. #
Minecraft settings
These are the setting I used to perform these tests. Almost everything is turned to the maximum, with the render distance set to 16 chunks.
Fullscreen resolution: (See above)
Graphics: Fancy
Smooth lighting: Maximum
VSync: Off
Render distance 16 chunks
Max frame rate: Unlimited
Clouds: Fast (fancy clouds really don’t look better IMO)
Fullscreen: up to you - see above
Particles: All
Entity shadows: On

Moom settings
Moom is a great little menu bar app that hijacks the green button in the window bar. It allows you to pin the screen edges or preferred sizes and locations. I use it here to set the window resolutions that I use for testing. I also use it regularly to set the window size to a standard video resolution and ratio ready for recording in OBS.
In the Moon application add a new view, set it to resize and type in the dimensions. Bear in mind these are points (pt), so on a retina screen, you need to half the numbers. Also, you must add 30pt to the vertical (second) number to account for the window bar. These sizes are below:
- 1080: 960x570
- 2k: 1280x750
- 4k: 1920 x 1110

If you like the look of the world I created, subscribe and follow along on my let’s play series. I recently made a world tour video showing everything I’ve achieved so far.